How to set up your own feeder roach colony

Care Sheet, DIY, Information 1 Comment »

How to set up your own feeder roach colony! As your collection of Tarantulas gets bigger and bigger you will notice that the need for feeding them does as well. Most of you end up purchasing large quantities of crickets as those are always readily available at any time at your local pet store. Crickets do not live long and it is a pain and heavy maintenance to keep them alive as you can imagine a small group of 5 grown tarantulas alone can end up taking you trips to the pet store weekly to buy more and more crickets! Your easier alternative is a simple feeder roach colony! Some of you might be thinking eew cockroaches! But in reality roaches will end up benefiting you a lot more in the long run then crickets every will!

As acknowledged by the A1 Bed Bug Exterminator | Charlotte North Carolina, your crickets will either: die easily, smell bad, create unwanted noise, jump and if they escape become hard to catch at times, chew through clothes and plastic and more importantly will not stand still for you to grab and give to your tarantula. All of this can make feeding your tarantula unpleasant at times.

Your cockroach however: are big in size and produce a more nutrient filled diet for your tarantula, do not produce much of a smell unless you stick your head directly into their enclosure, do not make noise, dont fly, cannot climb on smooth plastic or glass, are slow moving and can easily be picked up and given to your tarantula and most importantly live longer and are so much easier to breed.


So what do you need to get this colony started?

  • Plastic bin with a lid that preferably clips shut
  • Egg cartons, toilet paper rolls and or paper towel rolls
  • Heating pad (optional)
  • Roach food (such as vegetables, fruits, stale cereal, store bought cockroach food)
  • water dish with water crystals


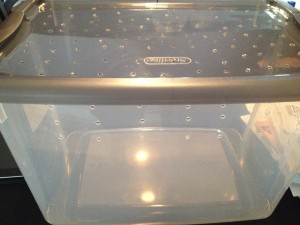
In this tutorial I used a 50 gallon clear plastic bin that I purchased at Target for $10. Now the only “labor intensive” part of this job which is how I ended up doing this and it seems to be working well is simply drilling small holes at the top of the lid and on the top sides shown in the pictures below.

IMG_1331IMG_1335IMG_1333


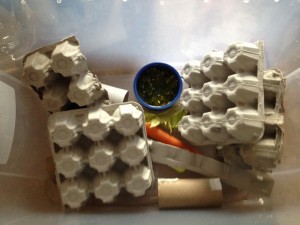
As you can see very simply and standard. As for what is really needed in the bin you will need just your egg cartons, paper towel rolls and or toilet paper rolls. Position them nicely in a way that your roaches will have something to hide under as they love darkness. Make sure in the center of it all you will have enough space to add their food source and a water dish, I personally use water crystals as they have been working well for me but if you see just normal water does the trick for you then you can stick to that. As for food source I typically keep my cockroaches (in this case B.dubia roaches) on a steady nutritious diet of leafy greens carrots and on occasion a piece of fruit. Reasons why I normally stay away from fruits is that if left in there for too long it will surely be a source of mold which can easily kill your colony. Cockroaches are not picky with food and eat vegetables just fine. As you will see below you can set up the bin however is best for you.

IMG_1332 IMG_1336

As you can see at this point your bin is ready to be filled with B.dubia roaches. You can keep stacking up more and more egg cartons and paper towel rolls as you place more roaches in. You can buy a starter roach colony online for about $15 dollars. Within weeks you should have a healthy roach colony that will keep reproducing. What I like doing is buying two colony starters one from one company and one for another company to make sure they are different breeding families.

My roach colony is in a specific dark room where the temperature is high for my tarantulas, if that is not the case for you, you can add a heating source such as a heating pad but be cautious and make sure that your plastic bin is heat resistant to prevent a fire.

These simple steps will easily help you with your own roach feeder colony. It will end up saving you time by not making trips to keep purchasing crickets and in the long run will save you quite a bit of money. As always if you need help ask away, we will be more then happy to guide you with your roach colony 🙂
Print This Post Print This Post

Basic Tarantula Care Sheet

Care Sheet No Comments »

Your Basic Tarantula Care Sheet! Tarantulas have become the pet to have they are perfect for just about anybody. Most species require low maintenance, are very affordable and best yet do not require too much space for housing (even if you are renting a room or apartment). In addition many people see how great one tarantula is and tend to acquire additional T’s and instantly become hobbyists. Though they are great pets it is key that you do the right homework for your specific tarantula. You should never obtain a tarantula without researching key elements for its survival and or handling of it in your care. We decided to make a general care sheet to help you out and that can be applied to most common tarantulas out there.


Habitat:

There are two ways of setting up a tarantula’s habitat.

You can set up a tarantula’s habitat artificially, which is the easiest and most of the times recommended for the novice tarantula keeper. Here you will try mimicking the tarantula’s habitat in the wild with basic essentials such as  temperature, humidity, substrate, hide and maybe even some bark and fake plants.

You can also set up a tarantula’s habitat Naturally, which is the most difficult and is recommended for the more experienced of tarantula keepers. Here you will try to create your own mini eco-system with live plants, organic decorations and arrangements even complicated designs on feeding, hiding/burrowing etc. Most mini ecological systems are unstable and here you might risk actually killing your tarantula if you are not sure what you are doing.


In this care sheet we are going to go with the artificial habitat for your pet tarantula. We are going to focus on the key elements that will benefit you and the life of your tarantula.


Housing:

First thing is first, the right enclosure for your pet tarantula. You must first check and see what type of tarantula you have, arboreal, terrestrial or burrowing.

  • Arboreal tarantulas love to climb and rarely spend their time on the floor of an enclosure. For these tarantulas you will want an enclosure that is bigger in height then it is in length or width.
  • Terrestrial tarantulas are the exact opposite and spend most of their time on the enclosure floor and though they might climb most are poor climbers. For these tarantulas you are going to want an enclosure that has more length and width then it would have height. You want to make sure its just high enough to allow your tarantula to flip over in the event it needs to molt.
  • Burrowing tarantulas like to dig and make their own hide “underground”. For these tarantulas you will want something similar to what you would have set up for a terrestrial tarantula however making sure you have enough space to add anywhere between 3 to 6 inches of substrate for it to burrow (depending on your tarantula’s size) in addition to giving it enough space to flip over “above ground” should it need to for a molt.

As for your enclosure size it is normally rule of thumb to give your tarantula 2 to 3 times its leg span as floor space to move around on. As for size you should be looking at housing your small to medium tarantulas in 2 to 5 gallon enclosures, medium to large tarantulas in 10 to 20 gallon enclosures and large to extra large tarantulas in 25 to 45 gallon enclosures.


Substrate:

The second thing to look for is substrate. The right substrate is key depending on your tarantula species as it will help out with both humidity and burrowing. There are many different types of substrate (garden soil, peat/green moss, potting soil, coconut fiber) and it ends up being personal preference. We recommend coconut fiber (such as eco earth which can now be purchased through our shop). The reason is simple, you can manipulated the way it works best for you. Whether you want to have it dry, damp or wet. In addition coconut fiber can last months before giving you an odd smell or you needing to change it. It actually breaks down your tarantula’s excrement so you can’t go wrong with that!


Light/Temperature/Humidity:

This is a combination and third thing to look out for. Most tarantulas actually prefer the darkness and you should never place them in direct sunlight as this might stress out your animal. Your tarantula needs minimal lighting and just the daylight in a room should be plenty. As for temperature and humidity they almost go hand in hand. Most tarantulas (depending on their origin) either like a dry warm environment or a damp to wet warm environment. Most tarantulas do well with just room temperature. Of course if you do live in colder climate you should most definitely have some sort of heating source that can be applied once you see temperatures get colder. It is key to have both a temperature and humidity thermometer. As for humidity most tarantulas only need some humidity which can easily be controlled with something as simple as overfilling a water dish in the enclosure. Of course there are some exceptions to this and for the tarantulas needing a lot more humidity you are going to want to wet/dampen enough of the substrate until reaching the required humidity levels.


Water/Food:

More important then food would be water. A tarantula always needs to stay properly hydrated. Make sure it has an adequate water dish that is always fully filled with clean water. Make sure its a shallow water dish to prevent your tarantula from drowning should it try to drink. As for food, tarantulas are insectivores and carnivores most tarantulas end up feasting just fine on insects such as fruit flies, crickets, cockroaches, locusts, moths, mealworms, etc but some tarantulas can also eat small lizards or even pinkie mice. We recommend you feed your tarantula a steady diet of nutrient filled insects. We normally do not recommend (for those of you with tarantula’s that are able to eat lizards and mice) for you to feed your tarantula mice/lizards. The reason simply being that it can cause calcium buildup in its exoskeleton which can become an issue when molting.


These simple steps should ensure you a healthy and happy tarantula. Two things we did not go over which we have care sheets for already are Spiderling (sling) care and Molting.

Do you have any additional questions? Want to add something to this? Your voice will be heard! Comment down below.

Spiderling Care

Care Sheet No Comments »

Spiderlings or slings are young or baby tarantulas ranging anywhere from .25 inches to 1.5 inches in length depending on how old it might be. The reason why so many people now opt in to buying a spiderling is due to the fact that they are usually a lot cheaper then adults and it is fascinating to watch them grow. As for growth rate, some species are very fast growing while others are extremely slow growing. It is best you chose which species is right for you. If your a beginner tarantula hobbyist we would recommend you start with a 1.5 inches or bigger spiderling. However here are some steps you can take to care for your sling.


Housing:

Depending on your species of tarantula spiderling it is key to know what enclosure and environment to have for your sling. Some common examples are

  • Terrestrial Tarantulas (Chilean Rosehair, Mexican Redknee, Brazilian Fire Red, etc): Smallest enclosures possible such as small pill jars of different sizes depending on your sling’s size until you can eventually move it into a deli container and eventually a 5 gallon tank (once a juvenile over 2 inches).
  • Arboreal Tarantulas (Pinktoe, Red Slate Ornamental, Pokies, etc): Small enclosure with height such as tall pill jars in different sizes depending on your sling’s size as they do love to climb and be up from the ground. As they get older you can switch them into tall spice jars until big enough to eventually switch to taller terrariums (once a juvenile over 2 inches).

You will find that slings do tend to burrow a lot more then your average tarantula, so be sure to add a extra substrate to the enclosures so they have enough space to do so. It is also important to make sure that each lid of your enclosure have air holes in them to provide your tarantula with adequate air to breathe. Make sure these holes are not big enough to where your sling can escape.


Food:

Feeding can be difficult as these spiderlings require much smaller prey then a full grown tarantula. You can crush a small cricket and leave that in their enclosure so they can eat off of it. As they do start to grow a little you can eventually just add smaller insects such as small juvenile or pinhead crickets as well as fruit flies. Once you see your sling getting closer to 1.5 to 2 inches you can start feeding it slightly bigger prey.


Water:

Spiderlings that are less than 1.5 inches cannot drink from waterbowls, they will surely drown. It is best to just water the substrate slightly (in which we do recommend eco-earth) or even just put some droplets to rest on top of the substrate or you can simply add a small plant leaf with a couple of water droplets on it. Once your tarantula does grow closer to 2 inches you can use a plastic bottle cap as a water dish in its small enclosure before being able to move to a big water dish. This all should provide plenty of water and humidity for your young tarantula.


Heat:

For spiderlings just make sure they are kept in a warm room. Being that they are so small it is not recommended to use a heating source on them as this might end up being too hot for their small enclosures. In addition do not place them under direct sunlight as this tends to stress out your tarantula. A room temperature of about 75-85 degrees should be adequate for them. You do not have to worry about light as most tarantulas actually prefer the darkness over light.


Following these instructions will most definitely help you with your sling. As always we are all here to help so feel free to drop us a comment for any additional help.


Verified by ExactMetrics